![[Previous]](prev.gif) |
![[Contents]](contents.gif) |
![[Index]](keyword_index.gif) |
![[Next]](next.gif) |
|
|
|
|
 |
This version of this document is no longer maintained. For the latest documentation, see http://www.qnx.com/developers/docs. |
This chapter includes:
The Photon microGUI is Neutrino's graphical user interface, and you can use it as a desktop environment, similar to other GUI desktop environments. This means you can run applications in windows, use the mouse for point-and-click and dragging operations, view directories and files graphically in a tree hierarchy, view multimedia files, and so on. Photon also provides the framework for graphical applications in embedded systems.
Many of the applications and utilities that come with Photon are documented in the Neutrino Utilities Reference. For information about programming Photon applications, see the Photon Programmer's Guide.
Whenever you use your mouse or press a key, you're giving input to a Photon application. And whenever the application displays data in a window, it's providing output. All these interactions are processed as tiny packets of data called events. You can think of all these input and output events traveling between you and Photon applications as photons, particles of light.
We call Photon a "microGUI" because of its size and architecture. Photon is a very small GUI. It's designed to fit in embedded systems, but it's also designed to be scaled up. Photon is perfectly at home in high-end, high-performance distributed systems.
Like Neutrino itself, Photon is built around a small microkernel. This modular architecture makes Photon fast, flexible, and inherently capable of network-distributed computing.
When you start Photon for the first time, you're prompted to set up your graphics card and settings.
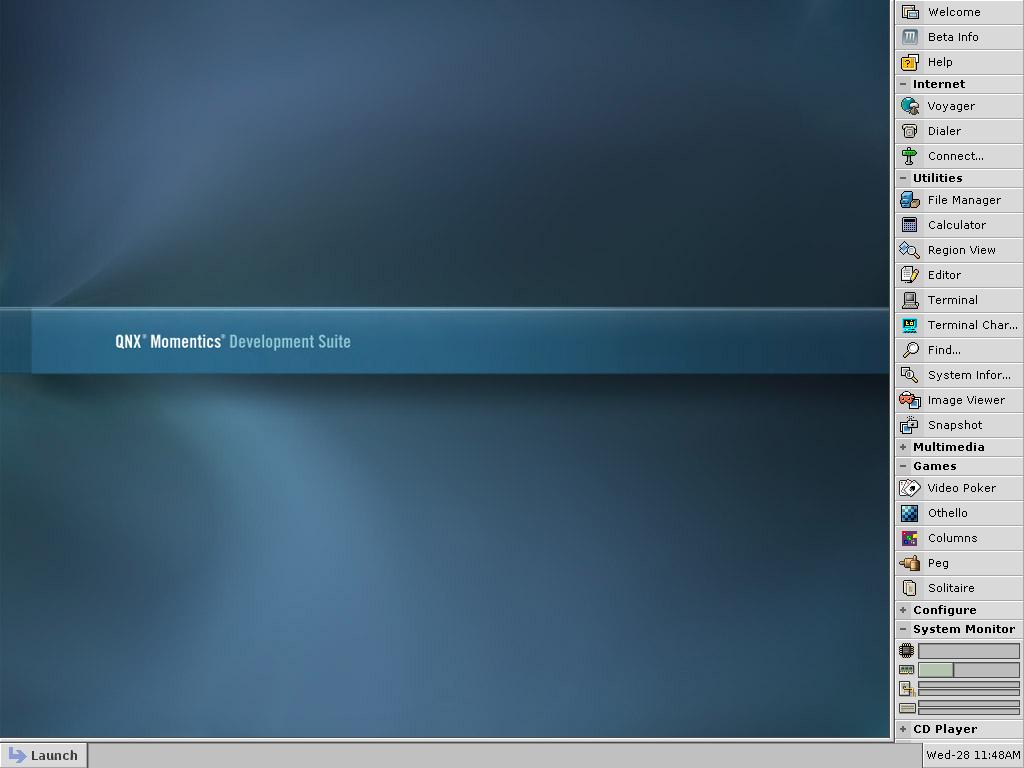
When Photon starts, you see your workspace, which is an area where you can run applications. The workspace consists of the taskbar, the shelf, and the desktop:
Photon's workspace, including the taskbar, shelf, and desktop.
The desktop is the main part of the screen. It's where application windows appear. In Photon, the desktop is actually a view, called a virtual console, into a much larger desktop space, which is three desktops wide by three desktops high. You can run applications in different consoles, and switch consoles by using keyboard shortcuts or the World View in the shelf.
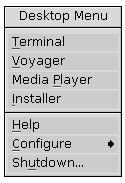
If you right-click anywhere on the desktop, you see the Desktop Menu, which lets you easily run frequently used applications, configure Photon, or shut down. You can customize this menu (see below).
Desktop menu.
The taskbar is the area at the very bottom of the screen. It includes, by default, the Launch button, the date and time, and icons for applications that are currently running.
From the taskbar, you can:
The shelf runs up the right side of your screen, and lets you easily launch frequently used applications and utilities, configure your system, view system resource usage, and switch consoles.
From the shelf, you can:
 |
You can also switch your console by pressing Ctrl-Alt-1...9, where the number is the console number. |
Right-click anywhere on the taskbar or shelf to configure or exit the shelf application. To run or restart shelf, type shelf & at a command line.
Drag the taskbar or shelf border to make it smaller or larger. If you drag the border to the bottom or right of the screen, the taskbar or shelf is put in autoshow mode, which means it appears only when you move the mouse over the edge of the screen.
You can configure the shelf by right-clicking on the shelf or taskbar and selecting Setup, or by running shelf -c from the command line. The shelf's configuration dialog looks like this:
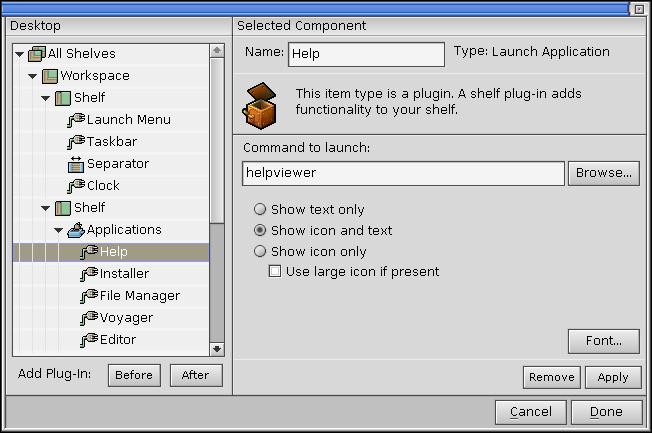
Shelf configuration dialog.
|
The shelf's default configuration file is /etc/photon/shelf/shelf.cfg. When you configure your shelf, the new settings are saved for your current user ID only, in $HOME/.ph/shelf/shelf.cfg. |
The items you can add or modify on the shelf include:
You can choose additional plugins by selecting the Browse button, including:
If you select this plugin from the shelf, it opens a User Configuration utility that lets you set and manage the time and date.
Note that this plugin doesn't work in a drawer; it must be at the top level in a shelf. For information about specifying the contents of the Launch menu, see "Modifying the Launch menu," below.
The launchmenu.so plugin populates the Launch menu, based on the contents of the $HOME/.ph/launchmenu and /etc/photon/launchmenu directories.
|
If there are conflicting items, the item found first prevails, so items encountered in your home directory's launchmenu directory take precedence over items encountered in the global one. |
Inside $HOME/.ph/launchmenu and /etc/photon/launchmenu, each directory corresponds to a submenu, and each file or symbolic link corresponds to a menu item, with the following exceptions:
For all other files, the plugin creates a menu item. Here's what happens when you select an item:
For all items (except *.tgt files), the launchmenu.so plugin uses the filename as the text to display for that item. You can use any characters in the filename (within the constraints of the underlying filesystem); the plugin assumes that these filenames use UTF-8 encoding.
The ampersand (&) takes on special meaning; the plugin interprets the character that follows as an accelerator key for that item. If you want to display a literal ampersand, specify it as && in the filename.
The launchmenu.so plugin uses target (*.tgt) files to give you more control than simple files give over launchable targets and how they're represented within the menu. You can use target files to specify one (or more) runnable targets, where each target corresponds to a single menu item. You specify the targets in this form:
[item1_text]
target = action
...
[item2_text]
target = action
...
Target files are organized into one or more sections, where each section specifies a target. The square brackets are part of the syntax; the text in them is the menu item's default text, following the same conventions as discussed above for filenames.
Each target is described by key=value pairs within the section. You must specify the target=action pair; it specifies what to do when the item is invoked. The action can be one of:
env1=val1... command options
If you don't specify the target key, the plugin ignores the section when it's generating menu items.
The optional keys are:
As mentioned above, the section name specifies the default text displayed for the item. If you want to provide items in multiple languages, you can specify an entry whose key is a language code as used by the ABLANG environment variable (see the International Language Support chapter of the Photon Programmer's Guide), and whose key is the text in that language. For example:
[Calculator]
target = phcalc
fr_FR = Calculatrice
By default, the launchmenu.so plugin sorts items alphanumerically by the displayed text. However, it also provides a degree of control over item ordering within the target specification. If you're shipping a package that includes a number of items to be included in a menu and you want them to be ordered in a specific manner regardless of their names (for instance, you deem some items to be more important and want to ensure they appear first), you can control this ordering in one of these ways:
Company name:Product Family:Name
In most cases, the company name alone should suffice, although you may wish to be more specific, depending on the number of product lines you offer.
After the plugin groups the items logically via the group entry, it sorts the items alphanumerically by the order entry. The order can be any string; you can simply use numbers, or you can choose a more elaborate scheme that will let you insert other items in the future.
Directories, files, and targets provide all the mechanisms necessary for populating menus with content, and even allow for a degree of control in terms of ordering. You can also use menu format-control files (named .menu) to fine-tune overall menu presentation and visually group related items.
Menu format is specified as a PxConfig-style file (see the Photon Library Reference), with each section specifying some form of control. The types of control are:
In the simplest case, the section has no entries, but you can also use the type entry to further specify which type of item to apply the match to. By default, the matching is applied to all items, but you may be more exclusive and supply specific types by grouping one or more of the following symbols as this entry's value:
For example, this code first groups all the submenu items, followed by everything else:
[*]
type = d
[*]
type = cef
For example, this code separates the submenus from the rest of the items:
[*]
type = d
[-]
[*]
type = cef
|
The launchmenu.so plugin won't place a separator at the start or end of the menu, or next to another separator. |
Or:
If this doesn't help you solve the problem, please let us know.
The Desktop menu is the one that pops up when you right-click anywhere on the Photon desktop.
You can run phmenu from the command line by typing phmenu &. This utility lets you drag and drop the menu items to the trash or to a new location. When the item is selected, you can modify the label shown in the menu, the hotkey, and the command to run. You can add new items by selecting the item you would like and dropping it into the desired location in the tree.
For more information, see phmenu and pwm in the Utilities Reference.
You can tell Photon to launch applications on startup. To do this, add the name of the application's executable to the $HOME/.ph/phapps configuration file. For example:
ped &
pterm &
helpviewer &
|
If the file doesn't exist, you need to create it, and make it executable by changing its properties with the File Manager, or by typing chmod +x ~/.ph/phapps. |
Photon provides various configuration tools that let you change your Photon settings. You can run them all from the command line, and some you can start from the shelf or Launch menu.
Select the Background tab to set the desktop color and pattern, or to select an image for the desktop backdrop.
|
Changing the language on your machine affects only the applications that support your choice. Other applications continue to use their default language. |
Photon comes with a file manager, pfm, that lets you browse directories and files using a graphical interface. To open the Photon File Manager, click File Manager in the Applications group on the shelf, or type pfm & on the command line.
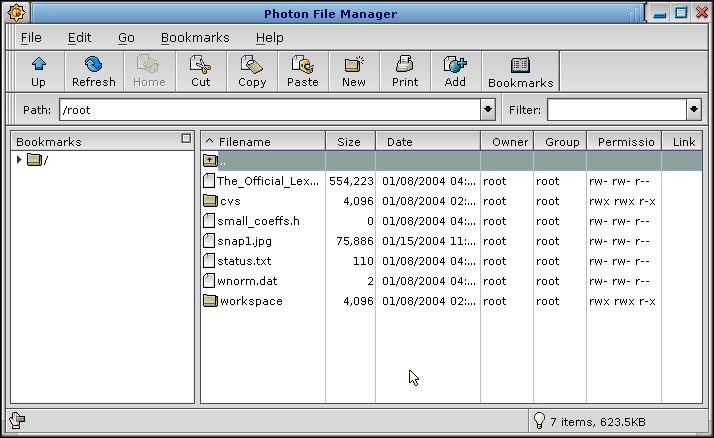
Photon File Manager.
The Photon File manager represents files and folders graphically. Double-click a folder to open it and display its contents; double-click a file to open it in an associated application (if an association exists). The File Manager also supports drag-and-drop operations; for example, you can drag a file to a folder to move it there. You can right-click a file or folder to view a shortcut menu that contains the available commands.
At the top of the File Manager are two text boxes that you can use to navigate and filter directory listings. You can type a path name directly into the Path box to jump to that directory. To view only files of a certain type or that start with a specific character, use the Filter box. For example, enter p* to view only files that start with the letter p, or enter *.ps to view only files that have the .ps suffix.
You can use the Photon File Manager menus to perform many file-management tasks. The toolbar at the top of the File Manager provides shortcuts for some commonly used commands. For more information, see pfm in the Utilities Reference.
You can view a listing of the most common keyboard shortcuts in File Manager by selecting . You can also view all currently defined bookmarks in a panel by clicking the Bookmarks toolbar shortcut.
Some of these commands are also available from the right-click menu in File Manager.
You can use the Photon Helpviewer to display our product documentation. The documentation is organized under the /usr/help/product directory.
To open the Helpviewer, click the Help button in the Applications group on the shelf, or select Help from the right-click shortcut menu on the desktop. You can also start the helpviewer by typing helpviewer & on the command line.
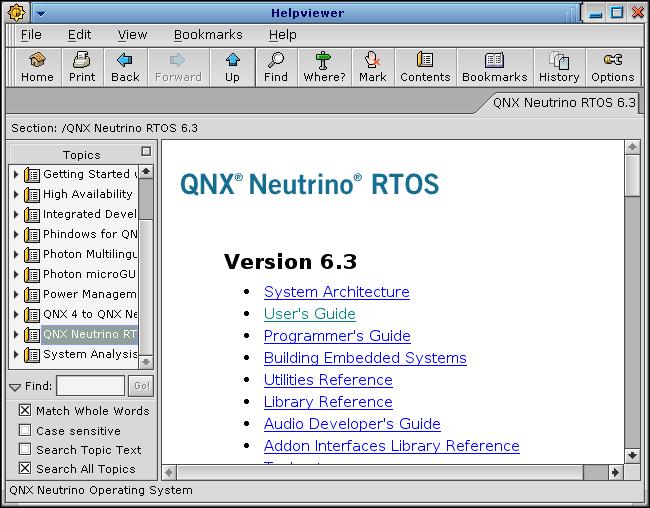
The Photon helpviewer.
In the Topics list, click the arrow next to a topic to view the subtopics it contains, or double-click a topic to make it the top topic in the list. Clicking on a topic displays its content in the topic pane.
You can also browse to topics by clicking on hypertext links within the topic text. Links are indicated by color and underline.
You can search for words in the help files by using the Find feature. The Find panel is located under the Topics list. If it isn't visible, select , or press Ctrl-T. Enter the word(s) in the Find box and click Go!. If you enter multiple terms, helpviewer finds topics that contain all the terms.
|
You might need to generate a full-text search index on a set of help files if one doesn't exist. To do so, select . For large help sets, such as Neutrino's, this operation can take several minutes. |
You can refine the search by selecting one or more of these find options:
The pterm terminal window lets you select (highlight) a portion of text and then invoke the Helpviewer by either:
or:
The Helpviewer starts, then searches the table of contents for any topics that contain the selected text. The first matching topic is automatically displayed.
You can also simply type something in a pterm window and then press Ctrl-Alt-H.
|
Most QNX documents include a keyword index that can also help you find
what you're looking for.
In the online docs, click the keyword-index button, which appears
at the top and bottom of each file:
|
If you find a topic that you want to view again later, you can bookmark it. This saves a quick link to that topic in the bookmarks list. To bookmark your current topic, select .
To view the list, click the Bookmarks toolbar button. Click an item in the list to view the topic. Bookmarks also appear in the Bookmark menu.
You can remove bookmarks by viewing the bookmarked topic, and then selecting .
The Helpviewer provides the following ways to navigate through the documentation:
| Task | Menu command | Shortcut |
|---|---|---|
| Go to the topmost help topic ("home" topic) in the help set | Ctrl-H | |
| Go to the previously viewed topic | Alt-<-- | |
| Return to the next topic (after using the command) | Alt---> | |
| Move up a level if you've opened a folder | Ctrl-U | |
| Open the topics pane if it's closed | Ctrl-T | |
| Open the search results panel if it's closed | Ctrl-S | |
| View where the currently displayed topic is located in the topics list | ||
| View a list of previously viewed topics | Ctrl-Y |
The online documentation also includes some navigation buttons at the top and bottom of each file:

Navigation buttons in the online docs.
The Contents button moves you "up" in the document:
You can view several topics at once by opening topics in a new topic window. Each open topic window is indicated by a tab above the topic pane.
To open a new topic pane, select , or press Ctrl-N. You can view any open topic by clicking on its tab. To close the current topic, select , or press Ctrl-D.
Photon ships with a web browser called Voyager that you can use to browse local HTML files or to browse the Internet.
|
Neutrino also includes an embedded web server called Slinger that you can use to build Internet access into embedded systems. For more information, see the Setting Up an Embedded Web Server chapter. |
To start Voyager, right-click anywhere on the desktop and select Voyager, or type voyager & at a pterm prompt.
The Voyager browser.
At the top of the Voyager window, you'll find a menubar, a toolbar, and site bar. At the bottom of the window is a status bar that displays the current document security status, which items are being loaded, and the current encoding setting; if you hover over a link, the link destination appears in the status bar. You can turn the toolbar, site bar, and status on or off.
Voyager supports several common image and multimedia file types, including .jpg, .gif, and .png (for images) and .mpg, .wav, .au, .aif, .mp3, .mp1, .mp2, .mpa, .mpv and .m2p (for audio and video).
You can view a Quick Reference Guide in Voyager at any time by clicking . For more information about using Voyager, see voyager in the Utilities Reference.
To set your preferences for Voyager, select . The configuration dialog includes these tabs:
You can configure Voyager to use different rendering engines, such as vserver, netfront, or Mozilla. Some preferences are specific to the rendering engine. See voyager in the Utilities Reference for more information about specifying a rendering engine (or web server) using web server profiles.
Caching can help Voyager display files and images faster. In addition to the disk cache size, you can specify:
Voyager doesn't refresh its versions of files that are on your network (i.e. URLs that start with file instead of http). If a file has been changed, click Reload to see the updated version.
In this part of the configuration dialog, you can specify:
If the browser is using the netfront server, these options are also available:
In this part of Voyager's configuration dialog, you can specify the following:
To find out the correct settings, see your Internet Service Provider (ISP) or system administrator.
You can specify the following in this part of the configuration dialog:
Use the Print tab to configure the way Voyager prints pages. Select one of the four corners of the page icon to view the current header or footer format. You can:
Use the Applications tab to configure helper applications for MIME content on web pages. You can:
Photon supports the following methods for connecting between computers running Photon:
The phditto utility lets you connect to a Photon session that's running on another computer. You can connect to an existing Photon session or start a new one. This utility lets you interact with the remote Photon session as though you were working directly on that node. In order to access the remote node using phditto, you must run phrelay on the remote machine.
You can end the phditto session by selecting Close from Phditto's window menu. To view this menu, right-click the phditto label in the Taskbar.
Phindows ("Photon in Windows") is a connectivity tool that lets you use Windows platforms to connect to and interact with graphical Photon applications running on a remote Neutrino computer.
If you're using TCP/IP, make sure the configuration is correct before you use Phindows:
In /etc/inetd.conf, add the line:
phrelay stream tcp nowait root /usr/bin/phrelay phrelay
In /etc/services, add the line:
phrelay 4868/tcp
|
These lines are already present in the configuration files, but they're commented out. Just remove the number sign (#) to add these entries. |
These two entries cause inetd to listen for incoming requests to establish a new Photon session. When a request is detected (from a remote Phindows client in our case), inetd automatically establishes a full TCP/IP connection and launches phrelay on that connection. Phindows is then fully connected to the local machine.
For more information about inetd, see the Utilities Reference.
To launch Phindows on your Windows machine, do one of the following:
Phindows displays a Connect dialog where you can specify the type of connection (TCP/IP or direct-connect serial). Various connection options are available, but the defaults usually work well.
If you request a TCP/IP connection, you must also specify the Internet address of the Neutrino computer you're connecting to (e.g. 198.53.31.1). If the remote computer has been configured properly, you should see a Photon login prompt, at which point you're connected and running Photon.
If you request a serial connection, then you must specify the COM port (e.g. COM1 or COM2). If you don't specify a baud rate, Phindows uses the current Windows default settings. With a serial connection, Phindows initially acts as a simple text terminal that lets you type commands directly to the modem (e.g. ATDT1-613-591-0934). Once connected, log into Neutrino and then issue the command:
/usr/bin/phrelay
This command causes Phindows to drop out of text-terminal mode and begin acting as a Photon graphical terminal. A Photon login screen should appear at this point.
You can use Phindows's command-line options to:
For more information, see the Phindows User's Guide.
You can use many keyboard shortcuts and hotkeys to perform tasks quickly and easily. The following tables show shortcuts for using pterm, editing text fields in Photon applications, managing windows, working with the Photon workspace, and others.
The Photon terminal emulator is called pterm. It behaves like a character-device driver; see "The keyboard at a glance" in Using the Command Line.
|
If you're in typeover mode, and you press Enter, you return to insert mode. |
The pterm program also supports the following shortcuts:
| If you want to: | Press: |
|---|---|
| Copy selected text to the clipboard. | Ctrl-Alt-X or Ctrl-Alt-C |
| Paste selected text from the clipboard. | Ctrl-Alt-V or
Ctrl-right mouse button |
| Toggle text selection | Ctrl-Alt-R |
| Search help with selected text | Ctrl-Alt-H |
| Set pterm options | Ctrl-Alt-O |
| Scroll through buffered lines | Ctrl-Alt-/\, Ctrl-Alt-\/, Ctrl-Alt-Page Up, Ctrl-Alt-Page Down, Ctrl-Alt-Home and Ctrl-Alt-End |
| Increase or decrease font and window size | Ctrl-Alt-[ and Ctrl-Alt-] |
| Increase or decrease font size only | Ctrl-Alt-, and Ctrl-Alt-. |
| If you want to: | Press: |
|---|---|
| Cut selected text. | Ctrl-X or
Ctrl-Alt-X |
| Copy selected text to the clipboard. | Ctrl-C or
Ctrl-Alt-C |
| Paste selected text from the clipboard. | Ctrl-V or
Ctrl-Alt-V or Ctrl-right mouse button |
The window manager, pwm, provides the following shortcuts:
| If you want to: | Press: |
|---|---|
| Move the window to the front | Alt-F2 |
| Move the window to the back | Alt-F3 |
| Close the window | Alt-F4 or
double-click the window menu button |
| Restore the window to previous size if it's been maximized | Alt-F5 or double-click the title bar |
| Move the window | Alt-F7 |
| Resize the window (use the mouse or cursor keys to choose the new size) | Alt-F8 |
| Minimize the window | Alt-F9 |
| Maximize the window | Alt-F10 or double-click the title bar |
The window manager, pwm, provides the following shortcuts:
| If you want to: | Press: |
|---|---|
| Move the backmost window to the front of the window stack | Alt-Esc |
| Cycle through the windows | Alt-Shift-Esc |
| Cycle forward or backward through the consoles | Ctrl-Alt-Enter or Ctrl-Alt-Backspace |
| Go to console n, where n is a digit from 1 through 9 | Ctrl-Alt-n |
| Display the Desktop Menu | Alt-Enter |
Photon skips any empty virtual consoles when you cycle through them.
The wmswitch process, which Photon starts automatically, provides these shortcuts:
| If you want to: | Press: |
|---|---|
| Cycle through the applications | Alt-Tab |
| Cycle in reverse order though the applications | Alt-Shift-Tab |
If you want to exit Photon, you can press Ctrl-Alt-Shift-Backspace.
|
Before entering this command, make sure that no applications or utilities are running on your computer. If there are, files may be left open. Moreover, if you reboot when a critical update is in progress, the filesystem might need maintenance. |
If you don't want anyone to be able to use this method to exit Photon, specify the -b option on the input driver for your system. For more information, see "Input drivers (devi-*)" in the Utilities Summary in the Utilities Reference.
Environment variables set options and determine the behavior of your system. You can use the command line to set environment variables that configure Photon, but the command depends on the shell that you're using. For ksh and esh, you can use the export command.
Here's a list of environment variable specific to Photon. For a general list of environment variables, see Commonly Used Environment Variables in the Utilities Reference.
For more information, see International Language Support in the Photon Programmer's Guide; for the currently supported codes, see /usr/photon/appbuilder/languages.def.
For more information, see International Language Support in the Photon Programmer's Guide, and ph in the Utilities Reference.
For more information, see ph in the Utilities Reference.
Here are some problems or questions that you might have concerning Photon:
If you want an alias to be defined in all of your shells (inside or outside a Photon terminal), set the alias in your shell's startup file. For more information, see "ksh's startup file" in the Configuring Your Environment chapter in this guide.
Alternatively, you can use the -l option to run pterm as a login shell, which causes it to run .profile. If you want to, you can change the Terminal item on the shelf so that it executes pterm -l. To do this, right-click the shelf and choose Setup. Select the Terminal entry and change pterm to pterm -l.
You should also change the Desktop pop-up menu to match; edit $HOME/.ph/wm/wm.menu (or run phmenu) and add the -l option to the pterm entry.
To open an arbitrary file without creating the .toc files, use the Voyager browser instead of the helpviewer.
export PHWMOPTS="-S"
For more information, see pwm in the Utilities Reference.
For example, pterm -K 17 sets the colors to blue text (1) on a light-gray background (7). You can also define the exact RGB values for all the 16 colors that pterm uses by creating a palette file. For more information, see pterm in the Utilities Reference.
A more permanent approach is to set the PHSHELF_DISABLE environment variable to 1. You can do this in your .profile file, with export PHSHELF_DISABLE=1.
|
|
|
|
